Difference between revisions of "CWS"
(→Spark Versions) |
(→Setup your own conda environment) |
||
| (8 intermediate revisions by the same user not shown) | |||
| Line 1: | Line 1: | ||
| − | [https://www.ibm.com/support/knowledgecenter | + | [https://www.ibm.com/support/knowledgecenter/SSZU2E_2.4.1/conductorwithspark_kc_welcome.html IBM Spectrum Conductor with Spark (CWS)] enables to efficiently deploy and manage multiple Spark deployments on DeepSense computing hardware. CWS supports multiple versions and instances of Spark, provides multitenancy through Spark instance groups, and maximizes usage of resources with increased performance and scale. |
== Accessing CWS == | == Accessing CWS == | ||
| Line 26: | Line 26: | ||
== Spark Workload == | == Spark Workload == | ||
| − | To create a Spark Instance Group (SIG), go to the management console and click Workload -> Spark -> Spark Instance Group. For the basic configuration you will need to specify the name, deployment directory and execution user. | + | To create a Spark Instance Group (SIG), go to the management console and click Workload -> Spark -> Spark Instance Group. For the basic configuration you will need to specify the name, deployment directory and execution user. For how to create and manage a SIG, please refer to the following [https://www.ibm.com/support/knowledgecenter/SSZU2E_2.4.1/developing_instances/sig.html instructions]. |
=== Spark Versions === | === Spark Versions === | ||
| Line 32: | Line 32: | ||
* Spark 2.4.3 | * Spark 2.4.3 | ||
* Spark 2.3.3 | * Spark 2.3.3 | ||
| + | |||
| + | == Setup your own conda environment == | ||
| + | A conductor user can add his/her created conda environments to the conductor such that his/her ML scripts or notebooks can use of them. Below is the detailed instruction about how a user add his/her customized conda environments to the conductor.<br> | ||
| + | On the GUI of the conductor, go to "Resources"-> "Frameworks" -> "Anaconda Management": | ||
| + | |||
| + | [[File:Conda-mgmt.png|none|500px|Anaconda Management]] | ||
| + | |||
| + | On the "Anaconda Management" webpage, click on the "Add" button to add your conda environments. You will see a form asking you to type in the information required. Below is the summary of a created Anaconda instance. You can refer to this example to input the information of your conda environment: | ||
| + | |||
| + | [[File:sample-conda-instance.png|none|800px|Anaconda instance example]] | ||
| + | |||
| + | You will have to finish the conda instance creation before you create your notebooks in the next step. During the creation of notebooks, you would be asked to input your conda environments. | ||
== Notebooks == | == Notebooks == | ||
| − | Notebooks provide an interactive environment for data analysis with visualization from a web browser. The Jupyter 5.4.0 notebook version is available. | + | Notebooks provide an interactive environment for data analysis with visualization from a web browser. The Jupyter 5.4.0 notebook version is available. Below is an instruction how to setup and use notebook on the Conductor.<br> |
| + | When you create your SIG, in the section "Enable notebooks", you would need to check the box of "Jupyter 5.4.0 and select your "Anaconda distribution instance" and "Conda environment". The following screenshot is an example: | ||
| + | |||
| + | [[File:SIG-Notebook.png|none|500px|Notebook creation when creating a SIG]] | ||
| + | |||
| + | Finish the creation the SIG and then deploy and start it before you are able to use the notebook. The example SIG here is named "Lu-Jun-Test". Click on the SIG name and open it. We can see the Notebooks tab in the following screenshot: | ||
| + | |||
| + | [[File:Notebook-Tab.png|none|500px|Notebook tab opening a SIG]] | ||
| + | |||
| + | Click the "Notebooks" tab, then click the green button "Create Notebooks for Users", select yourself as the the user, and click the "Create" button: | ||
| + | |||
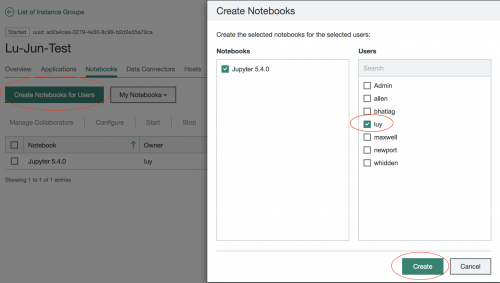
| + | [[File:Create-Notebooks.png|none|500px|Create notebooks]] | ||
| + | |||
| + | After you create the Notebooks, you can click on the button "My Notebooks" and select your notebook: | ||
| + | |||
| + | [[File:My-notebook.png|none|700px|My created notebook]] | ||
| + | |||
| + | After you click the Jupyter notebook you just created, you would be directed to a new web browser. Close the browser. You will need to go to the directory where your SIG is deployed to find the url with the token created and then copy and paste the url to a web browser to open the notebook. Here's an example: | ||
| + | The test SIG is deployed in /dshome/faculty/luy/Lu-Jun-Test/. In the deploy directory, you will be able to find a directory similar to this: | ||
| + | /dshome/faculty/luy/Lu-Jun-Test/Jupyter-5.4.0/Lu-Jun-Test/ad2a4cea-0279-4e30-8c99-b2d2e35a79ca/Jupyter-5-4-0-1/logs | ||
| + | In this directory, you are able to find a file named "ipython.log". Open this file, you would able to find the url similar to the following: | ||
| + | https://127.0.0.1:8890/?token=8fa719b4e98e34e555f864f73113eca1acbe45ad4ec03618 | ||
| + | This would be the url you copy and paste to your web browser. However, before you copy and paste the url to your web browser, you need to forward the port to your local machine. This is the same as we open notebook when we submit jobs using LSF: | ||
| + | ssh -l <username> login1.deepsense.ca -L <local_port>:<remote_host>:<remote_port> | ||
| + | for example, | ||
| + | ssh -l user1 login1.deepsense.ca -L 8890:ds-cmgpu-04:8890 | ||
| + | Note that you may need to use a different <local_port> than 8890 if you have other web services running on your local computer. In particular, if you run a jupyter notebook locally then it will use port 8890 and you will try to connect to the local jupyter notebook instead of the cluster notebook. In this case close your port forwarding and try again with 8890 or another unused port. | ||
| + | |||
| + | After the port forwarding is done, you can copy and paste the url to your web browser. The notebook would be opened for you. | ||
Latest revision as of 15:12, 16 December 2020
IBM Spectrum Conductor with Spark (CWS) enables to efficiently deploy and manage multiple Spark deployments on DeepSense computing hardware. CWS supports multiple versions and instances of Spark, provides multitenancy through Spark instance groups, and maximizes usage of resources with increased performance and scale.
Contents
Accessing CWS
In order to access the Spectrum Conductor and get started with Spark application you can either use the web interface management console or the command-line interface.
Management Console
The management console, which is the web interface to IBM Spectrum Conductor with Spark, provides a single point of access to key system components for cluster monitoring and control, configuration, and troubleshooting. The web interface to the DeepSense IBM CWS Management Console is at https://ds-mgm-02.deepsense.cs.dal.ca:8443. Go to the url and log in using your DeepSense account information.
Command Line Option
Spectrum Conductor with Spark also includes a Command-Line Interface (CLI) for administration. You can launch the CLI by starting a command console and source the environment for your shell.
Steps to launch the command console:
- From the login node, ssh to ‘ds-cmhm-02.deepsense.cs.dal.ca’
ssh ds-cmhm-02.deepsense.cs.dal.ca
- Source the environment for your shell:
source /software/WMLA/wmla/profile.platform
- Login using your account:
egosh user logon -u ‘user_name’ -x ‘password’
- You can see the list of available resources:
egosh resource list
- View current activity:
egosh activity view
The complete list of the CLI commands with details is available at the IBM Knowledge Center.
Spark Workload
To create a Spark Instance Group (SIG), go to the management console and click Workload -> Spark -> Spark Instance Group. For the basic configuration you will need to specify the name, deployment directory and execution user. For how to create and manage a SIG, please refer to the following instructions.
Spark Versions
After specifying the basic configuration, you can choose one of the Spark versions to deploy. Currently, the following Spark versions are available:
- Spark 2.4.3
- Spark 2.3.3
Setup your own conda environment
A conductor user can add his/her created conda environments to the conductor such that his/her ML scripts or notebooks can use of them. Below is the detailed instruction about how a user add his/her customized conda environments to the conductor.
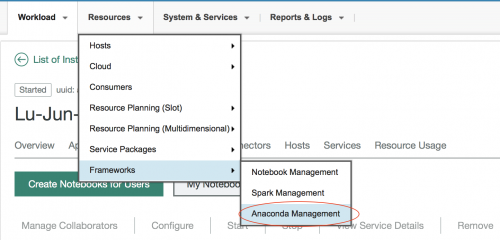
On the GUI of the conductor, go to "Resources"-> "Frameworks" -> "Anaconda Management":
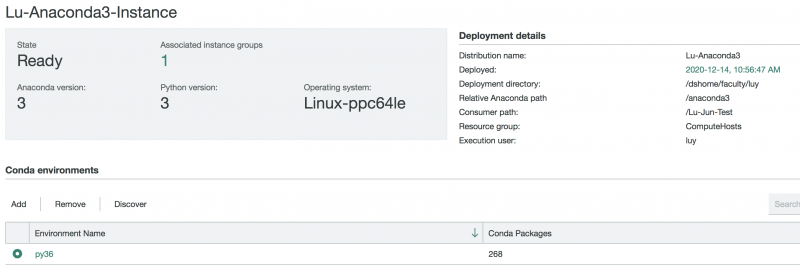
On the "Anaconda Management" webpage, click on the "Add" button to add your conda environments. You will see a form asking you to type in the information required. Below is the summary of a created Anaconda instance. You can refer to this example to input the information of your conda environment:
You will have to finish the conda instance creation before you create your notebooks in the next step. During the creation of notebooks, you would be asked to input your conda environments.
Notebooks
Notebooks provide an interactive environment for data analysis with visualization from a web browser. The Jupyter 5.4.0 notebook version is available. Below is an instruction how to setup and use notebook on the Conductor.
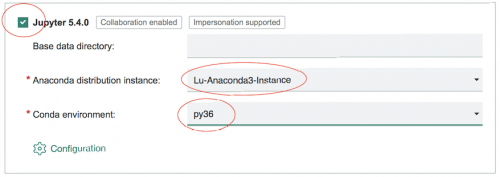
When you create your SIG, in the section "Enable notebooks", you would need to check the box of "Jupyter 5.4.0 and select your "Anaconda distribution instance" and "Conda environment". The following screenshot is an example:
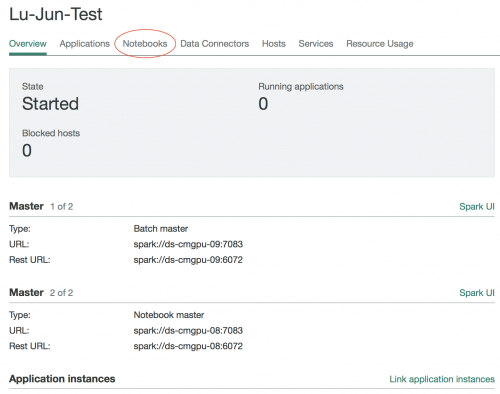
Finish the creation the SIG and then deploy and start it before you are able to use the notebook. The example SIG here is named "Lu-Jun-Test". Click on the SIG name and open it. We can see the Notebooks tab in the following screenshot:
Click the "Notebooks" tab, then click the green button "Create Notebooks for Users", select yourself as the the user, and click the "Create" button:
After you create the Notebooks, you can click on the button "My Notebooks" and select your notebook:
After you click the Jupyter notebook you just created, you would be directed to a new web browser. Close the browser. You will need to go to the directory where your SIG is deployed to find the url with the token created and then copy and paste the url to a web browser to open the notebook. Here's an example: The test SIG is deployed in /dshome/faculty/luy/Lu-Jun-Test/. In the deploy directory, you will be able to find a directory similar to this:
/dshome/faculty/luy/Lu-Jun-Test/Jupyter-5.4.0/Lu-Jun-Test/ad2a4cea-0279-4e30-8c99-b2d2e35a79ca/Jupyter-5-4-0-1/logs
In this directory, you are able to find a file named "ipython.log". Open this file, you would able to find the url similar to the following:
https://127.0.0.1:8890/?token=8fa719b4e98e34e555f864f73113eca1acbe45ad4ec03618
This would be the url you copy and paste to your web browser. However, before you copy and paste the url to your web browser, you need to forward the port to your local machine. This is the same as we open notebook when we submit jobs using LSF:
ssh -l <username> login1.deepsense.ca -L <local_port>:<remote_host>:<remote_port>
for example,
ssh -l user1 login1.deepsense.ca -L 8890:ds-cmgpu-04:8890
Note that you may need to use a different <local_port> than 8890 if you have other web services running on your local computer. In particular, if you run a jupyter notebook locally then it will use port 8890 and you will try to connect to the local jupyter notebook instead of the cluster notebook. In this case close your port forwarding and try again with 8890 or another unused port.
After the port forwarding is done, you can copy and paste the url to your web browser. The notebook would be opened for you.
