Difference between revisions of "How to Transfer Data"
m |
(→Windows: added info on how to create network location) |
||
| Line 40: | Line 40: | ||
==== Windows ==== | ==== Windows ==== | ||
| − | On windows computer, you should connect to <code> | + | On windows computer, you should connect to <code>\\protocol1.deepsense.ca\data</code> or <code>\\protocol2.deepsense.ca\data</code>. To do this the first time, open a file explorer window. |
| + | Right-click on This PC, and select "add a network location". In the wizard, click next and then select "Choose a custom network location" (this was the only option I saw). Highlight it, and click next. On the following screen, enter one of the addresses above, and click next. You may now enter a name for this location. Do so, and click next again. On the last screen, you should be able to look over your selections, and then click Finish. The name you chose should now be available under "This PC" in your file explorer. | ||
| + | |||
| + | You may also have to change a SMB security level setting as follows (this was necessary in Windows 10): | ||
Control Panel > System and Security > Administrative tools > Local Security Policy > expand Local Policies > Security options > click on Network security: Lan Manager authentication level > Then in the field choose > Send NTLMv2 responses only > click on Apply, then ok and close all. | Control Panel > System and Security > Administrative tools > Local Security Policy > expand Local Policies > Security options > click on Network security: Lan Manager authentication level > Then in the field choose > Send NTLMv2 responses only > click on Apply, then ok and close all. | ||
| − | |||
| − | |||
== From the World Wide Web == | == From the World Wide Web == | ||
The standard tool for downloading data from websites is [https://en.wikipedia.org/wiki/Wget wget]. Also available is [https://curl.haxx.se/ curl]. The two are compared in this [https://unix.stackexchange.com/questions/47434/what-is-the-difference-between-curl-and-wget StackExchange article]. | The standard tool for downloading data from websites is [https://en.wikipedia.org/wiki/Wget wget]. Also available is [https://curl.haxx.se/ curl]. The two are compared in this [https://unix.stackexchange.com/questions/47434/what-is-the-difference-between-curl-and-wget StackExchange article]. | ||
Revision as of 15:11, 16 April 2020
There are different methods for transferring data to and from the DeepSense platform. Which method you use will depend from where you are transferring the data, as well as the size of the data.
Contents
To and From Your Personal Computer
Login Nodes
Since the two login nodes are the primary point of access for the platform, they may be in heavy use. We do not want to overload them unnecessarily for data transfer. Please only use this for small amounts of data.
The most common method for transferring data securely between machines will be scp. This is pretty straightforward to use.
Example: scp -r /path/to/files/ username@login2.deepsense.ca:/data/projectdir/
One can also use rsync (see the man page). This has more options than scp, and can be used to sync files
between two machines.
Example: rsync -azvhP /path/to/files/ username@login2.deepsense.ca:/data/projectdir/
The rsync options above are:
- a - archive mode, equal to rlptgoD (recursive, preserve links, times, permissions, group, owner, etc)
- z - use compression when copying
- v - verbose: list files copied
- h - human readable: output numbers in human readable format
- P - same as --partial --progress. Show progress while transferring, and keep partial files.
Protocol Nodes
The protocol nodes (protocol1.deepsense.ca, protocol2.deepsense.ca) are specifically meant for large data transfers. However, they are only accessible via samba.
Mac OSX
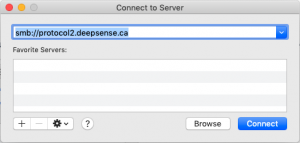
On a Mac, open finder and hit ⌘-K, or use the menu Go -> Connect to Server. In the dialog box (see image), type the address for either protocol node, and you can login. This will connect you to the /data filesystem.
If you want to use rsync to transfer data via the protocol nodes, you have to mount one. On a Mac, the easiest way is to connect to the protocol node as in the previous paragraph. This will mount it at /Volumes/data/. You can now use rsync to copy files to your project's subdirectory.
Example: rsync ‑rzvh /path/to/files/ /Volumes/data/projectdir/
Windows
On windows computer, you should connect to \\protocol1.deepsense.ca\data or \\protocol2.deepsense.ca\data. To do this the first time, open a file explorer window.
Right-click on This PC, and select "add a network location". In the wizard, click next and then select "Choose a custom network location" (this was the only option I saw). Highlight it, and click next. On the following screen, enter one of the addresses above, and click next. You may now enter a name for this location. Do so, and click next again. On the last screen, you should be able to look over your selections, and then click Finish. The name you chose should now be available under "This PC" in your file explorer.
You may also have to change a SMB security level setting as follows (this was necessary in Windows 10):
Control Panel > System and Security > Administrative tools > Local Security Policy > expand Local Policies > Security options > click on Network security: Lan Manager authentication level > Then in the field choose > Send NTLMv2 responses only > click on Apply, then ok and close all.
From the World Wide Web
The standard tool for downloading data from websites is wget. Also available is curl. The two are compared in this StackExchange article.
